
Introduction
What if I told you the average American home cook gets one critical thing wrong about a proper indian chicken curry recipe every single time? It’s not the spice level or even the heat—it’s the technique. Honestly, most recipes online rush the process, creating a sauce that’s watery, bland, and honestly, a little sad. We’ve all been there, right? You follow a recipe to the letter, but your curry just doesn’t taste like it came from your favorite restaurant or your friend’s Indian grandma’s kitchen. The secret isn’t a magic ingredient you can’t pronounce; it’s patience and a little bit of science. And today, I’m going to walk you through it, step-by-step, so you can create a soul-warming, authentic murgh curry recipe that will blow your socks off.
My own “aha!” moment came after a minor kitchen disaster. I’d spent a fortune on spices, chopped enough onions to make me cry for a week, and patiently simmered my heart out. The result? A curry where the oil had separated and pooled on top, floating over a gritty, underwhelming gravy. I was crushed. It was through that failure, and a lengthy chat with a chef from Delhi, that I learned the art of the “bhuna”—the crucial frying of the masala. It’s the bedrock of flavor. This isn’t just another recipe; it’s a lesson in transforming simple ingredients into something transcendent. So, tie on your apron. Let’s dive in.
What You’ll Need: The Cast of Characters

Gathering your ingredients is like meeting the cast of a blockbuster movie. Every single one has a starring role. Don’t worry, I’ve included easy swaps if you can’t find something. The goal here is depth and warmth, not five-alarm fire (unless you want it!).
For the Chicken Marinade:
- 2 lbs (about 1 kg) chicken thighs, bone-in and skinless. (Trust me, thighs are more forgiving and flavorful than breast meat. It’s the difference between a juicy bite and a dry one.)
- ½ cup plain yogurt (full-fat is best for creaminess and tenderizing)
- 1 tbsp ginger-garlic paste (or freshly minced equivalent)
- 1 tsp turmeric powder
- 1 tsp Kashmiri red chili powder (This gives amazing color without insane heat. Sub: ½ tsp paprika + ½ tsp cayenne for more kick)
- Salt to taste (about 1 tsp)
For the Curry Base (The Masala):
- 3 tbsp ghee or neutral oil (Ghee adds an incredible nutty aroma)
- 2 large onions, thinly sliced (These are the unsung heroes, providing the sauce’s body and sweetness)
- 2 large tomatoes, finely chopped (Use the ripest, reddest ones you can find)
- 1 tbsp cumin seeds
- 2-3 green cardamom pods, lightly crushed
- 1 Indian bay leaf (tej patta)
- 1-inch cinnamon stick
- 2 tsp coriander powder
- 1 tsp garam masala (plus more for finishing)
- Fresh cilantro, chopped, for garnish
- 1-2 green chilies, slit (optional, for those who like it hot)
- 1 cup water, approximately
Timing is Everything: Your Curry Countdown
Let’s be real, a great curry isn’t a 20-minute meal—it’s a labor of love. But the active time is way less than you think! The secret is letting things simmer and develop flavor while you, I don’t know, finally fold that laundry that’s been staring at you.
- Prep Time: 20 minutes (includes marinating time)
- Cook Time: 50 minutes
- Total Time: 1 hour 10 minutes
Compare that to ordering in? You’ll spend less time making this from scratch than you would waiting for a delivery driver on a busy night. And the payoff is infinitely better.
Crafting Your Masterpiece: The Step-by-Step Guide
This is where the magic happens. Read through all the steps once before you start. I’ve packed each one with the little tips that make a huge difference.
Step 1: The Flavor Foundation (Marinating the Chicken)
In a large bowl, combine the yogurt, ginger-garlic paste, turmeric, red chili powder, and salt. Whisk it until it’s smooth. Add your chicken pieces and massage that flavorful paste into every nook and cranny. Cover the bowl and let it hang out in the fridge for at least 30 minutes. Overnight is even better! This isn’t just for flavor; the enzymes in the yogurt work to tenderize the chicken, guaranteeing you a juicy result.
Step 2: Building the Base (The All-Important Bhuna)
Heat the ghee or oil in a heavy-bottomed pot or Dutch oven over medium heat. Toss in the whole spices—cumin seeds, cardamom pods, bay leaf, and cinnamon stick. Let them sizzle for about 30 seconds until they become incredibly fragrant. This is called “tadka” or tempering, and it’s how you unlock the essential oils in the spices. Next, add your thinly sliced onions. Now, here’s the first test of patience: cook them slowly, stirring occasionally, for 15-20 minutes until they turn a deep, golden brown. Not just translucent, but properly caramelized. This is non-negotiable for a rich, dark gravy.
Step 3: The Tomato Tango
Once your onions are beautifully browned, add your chopped tomatoes and a pinch of salt. The salt will help break them down. Cook this mixture, stirring frequently, until the tomatoes completely break down and the oil starts to separate from the sides of the masala paste. You’ll see little pools of ghee around the edges. This can take another 10-15 minutes. This step is the true heart of your indian chicken curry recipe. Rushing it is the number one mistake people make!
Step 4: Spice Up Your Life
Now, add your powdered spices: coriander powder and garam masala. Stir them into the onion-tomato mixture and cook for just a minute until raw smell disappears. This toasts them and deepens their flavor profile immensely.
Step 5: Bringing It All Together
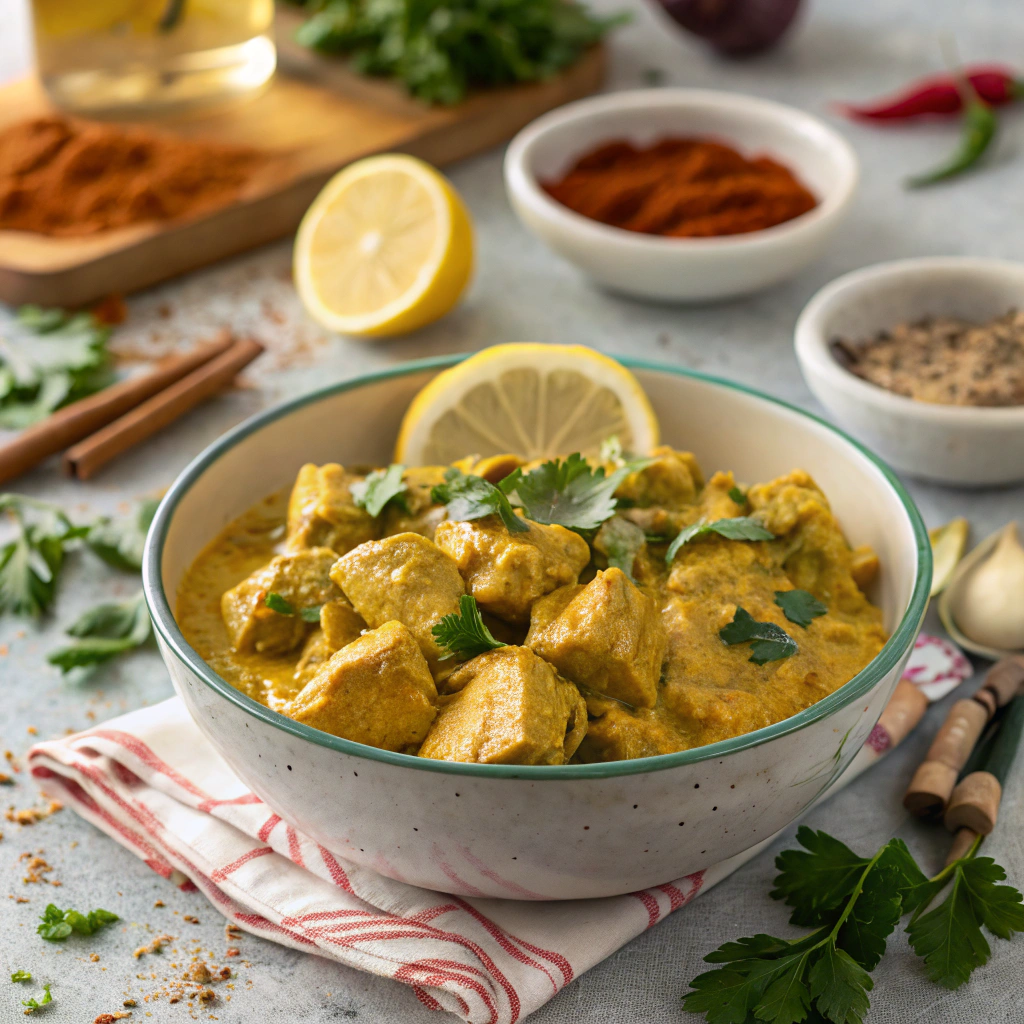
Add the marinated chicken to the pot. Increase the heat to medium-high and sear the chicken for 4-5 minutes, turning the pieces so they get coated in the masala and cook on the outside. Pour in about 1 cup of water, just enough to come halfway up the chicken pieces. Bring it to a boil, then immediately reduce the heat to low, cover the pot, and let it simmer gently for 20-25 minutes.
Step 6: The Final Touches
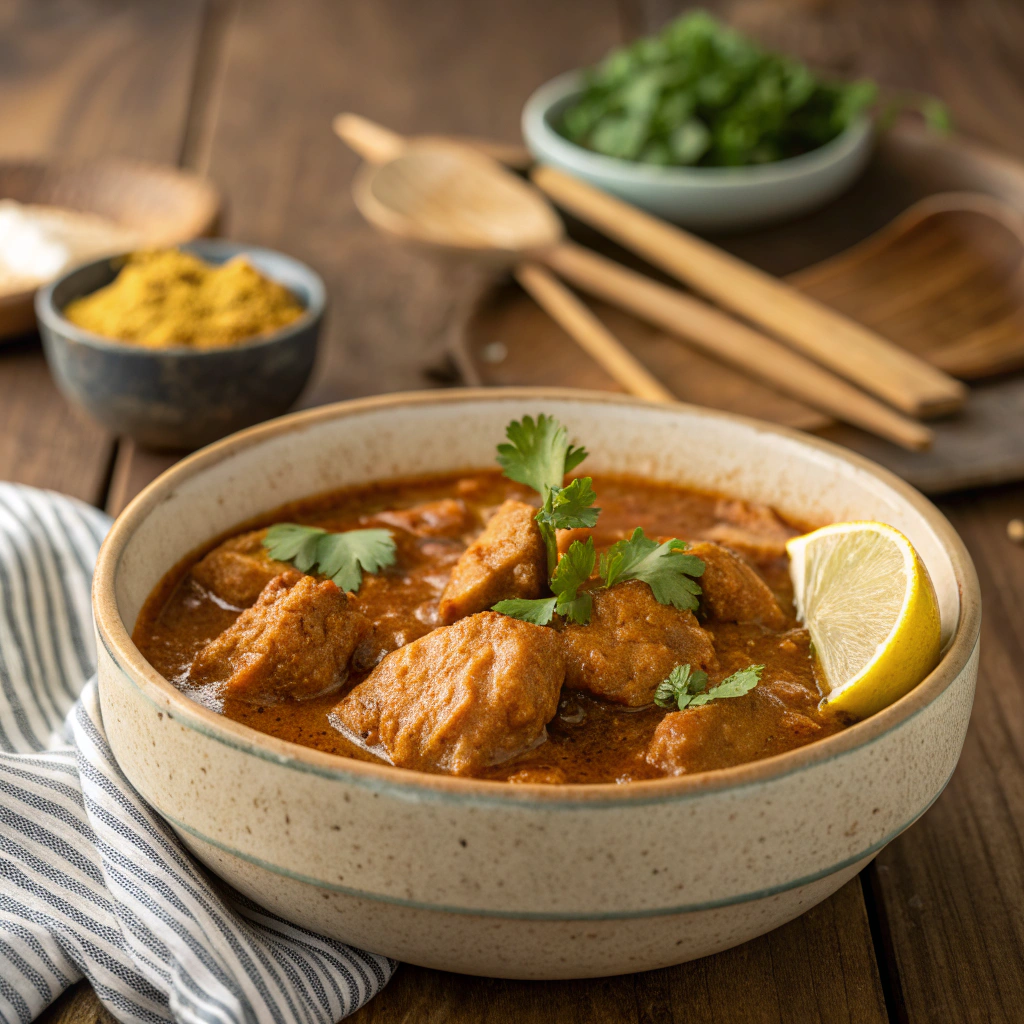
Once the chicken is cooked through and tender, take the lid off. If your gravy is too thin, let it simmer uncovered for a few more minutes to reduce to your desired consistency. The final flourish? A sprinkle of garam masala and a huge handful of fresh cilantro. Give it one final stir, and you’re done!
What’s in This Bowl of Goodness? Nutritional Information
I’m not a nutritionist, but I believe in knowing what’s going into my body. This isn’t just tasty; it’s packed with good stuff. Based on standard ingredient data, a serving (about 1.5 cups) contains approximately:
- Calories: ~450 kcal
- Protein: ~35g (Chicken thighs for the win!)
- Fat: ~25g (Using ghee provides healthy fats)
- Carbohydrates: ~15g
- Fiber: ~3g (Thanks to all those onions and tomatoes)
The spices aren’t just flavor bombs; turmeric is a renowned anti-inflammatory, and ginger aids digestion. It’s a meal that truly nourishes you from the inside out.
Want to Lighten It Up? Healthier Alternatives
Love curry but watching your calories? No problem! This recipe is wonderfully adaptable.
- Leaner Protein: Swap chicken thighs for skinless chicken breast. Just reduce the simmering time by 5-10 minutes to prevent dryness.
- Less Fat: Use a light cooking spray or avocado oil instead of ghee. You can also skim off any excess oil that rises to the top after cooking.
- Creamier without Cream: For a dairy-free creaminess, stir in a few tablespoons of cashew paste or coconut milk at the very end. It’s delicious and adds a new flavor dimension!
How to Serve Your Authentic Murgh Curry
This is the fun part! Your curry is the superstar, but it needs a great supporting cast.
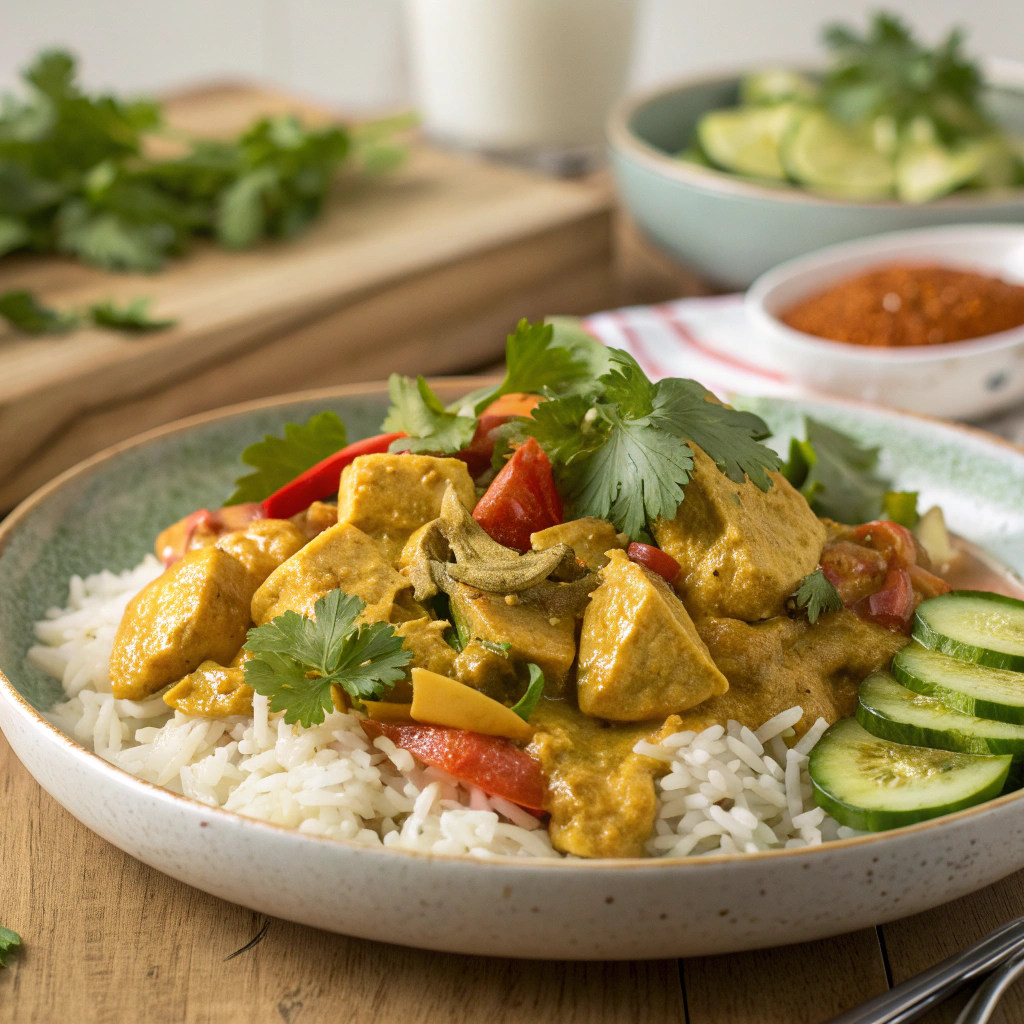
- The Classic: Serve it steaming hot over a bed of fluffy basmati rice. A side of cooling cucumber raita is chef’s kiss.
- Family-Style Feast: Pile the curry into a big bowl in the center of the table alongside naan, roti, or paratha for dipping and scooping. Don’t forget some tangy mango chutney and pickled onions!
- Low-Carb Bliss: Ditch the grains and serve your curry over cauliflower rice or with a side of roasted vegetables. It’s just as satisfying.
Don’t Make These Mistakes! Common Curry Pitfalls
After years of trial and error (and that one aforementioned disaster), here’s what to avoid:
- Rushing the Onions: Pale, translucent onions will give you a pale, sad gravy. Take the time to brown them. It’s the soul of the dish.
- Not Letting the Oil Separate: If you don’t cook your tomato-onion masala until the oil separates, your curry will taste raw and acidic.
- Overcrowding the Pot: If you’re doubling the recipe, use a bigger pot. Crowding the chicken will cause it to steam instead of sear.
- Boiling, Not Simmering: A rolling boil will make your chicken tough. A gentle simmer is the key to tender meat.
Making Life Easier: Storing & Reheating Tips
Honestly, this murgh curry recipe often tastes even better the next day! The flavors have more time to mingle and get to know each other.
- Storing: Let the curry cool completely before storing it in an airtight container in the fridge. It will keep beautifully for up to 3-4 days.
- Freezing: This curry freezes exceptionally well for up to 3 months. Just thaw overnight in the fridge before reheating.
- Reheating: Gently reheat it in a saucepan over low heat, adding a tiny splash of water if it has thickened up too much. Microwaving can sometimes make the chicken rubbery, so stovetop is best.
Ready to Become a Curry Master?
See? Making an incredible, authentic Indian chicken curry at home isn’t about secret ingredients—it’s about respecting the process. It’s about patience, love, and the incredible transformation of simple ingredients into something truly magical. I promise you, the smell that will fill your kitchen is worth every single second.
So, what are you waiting for? Grab that pot and get cooking! I’d love to hear how it turns out. Did you nail the perfect bhuna? Did your family beg for seconds? Leave a comment below and tell me about your curry journey. And if you’re hungry for more, check out my other recipes for perfect basmati rice or homemade naan to complete your feast. Happy cooking!
Your Curry Questions, Answered (FAQs)
Q: Can I use chicken breast instead of thighs in this Indian chicken curry recipe?
A: Absolutely! Just be extra careful not to overcook it. Reduce the simmering time to 15-20 minutes and check for doneness earlier, as breast meat can dry out faster than juicier thighs.
Q: My curry is too spicy! How can I tone down the heat?
A: No worries! A squeeze of fresh lemon juice or a tablespoon of yogurt stirred in at the end can help balance the heat. Adding a bit of coconut milk or cream will also mellow it out beautifully.
Q: What’s the best substitute for ghee?
A: Unsalted butter is a great substitute and will still give you a rich flavor. For a dairy-free option, a neutral oil like avocado or grapeseed oil works perfectly well.
Q: Why is my curry watery?
A: This usually means the masala base wasn’t cooked down enough initially, or you added too much water. The fix is easy: simply simmer the finished curry uncovered until it reduces to your preferred thickness.
Q: Can I make this curry in an Instant Pot or pressure cooker?
A: You can! Sauté your onions and tomatoes right in the pot using the “Sauté” function. Follow steps 2-4, then add the chicken and only ½ cup of water. Pressure cook on high for 8 minutes, then do a quick release.
Leave a Reply
You must be logged in to post a comment.