Introduction
Seriously, have you ever bitten into something so perfectly crunchy, chewy, and chocolaty that it instantly transported you back to your childhood? For me, that’s a square of chocolate tiffin. It’s the no-bake hero of the dessert world, a humble traybake that punches so far above its weight it’s almost unfair to fancy French patisserie.
And get this: its origins are as rich as its flavor. During World War II, rationing made traditional baking with eggs, flour, and butter a real challenge. So, ingenious home bakers across the UK got creative, using what they had: biscuits, syrup, cocoa, and dried fruit. They created a treat that required no oven—saving precious fuel—and thus, the glorious chocolate tiffin recipe was born from necessity. It’s a slice of history you can eat, and honestly, it’s one of the easiest and most satisfying desserts you’ll ever make. Let’s dive in.
What You’ll Need: The Symphony of Simple Ingredients
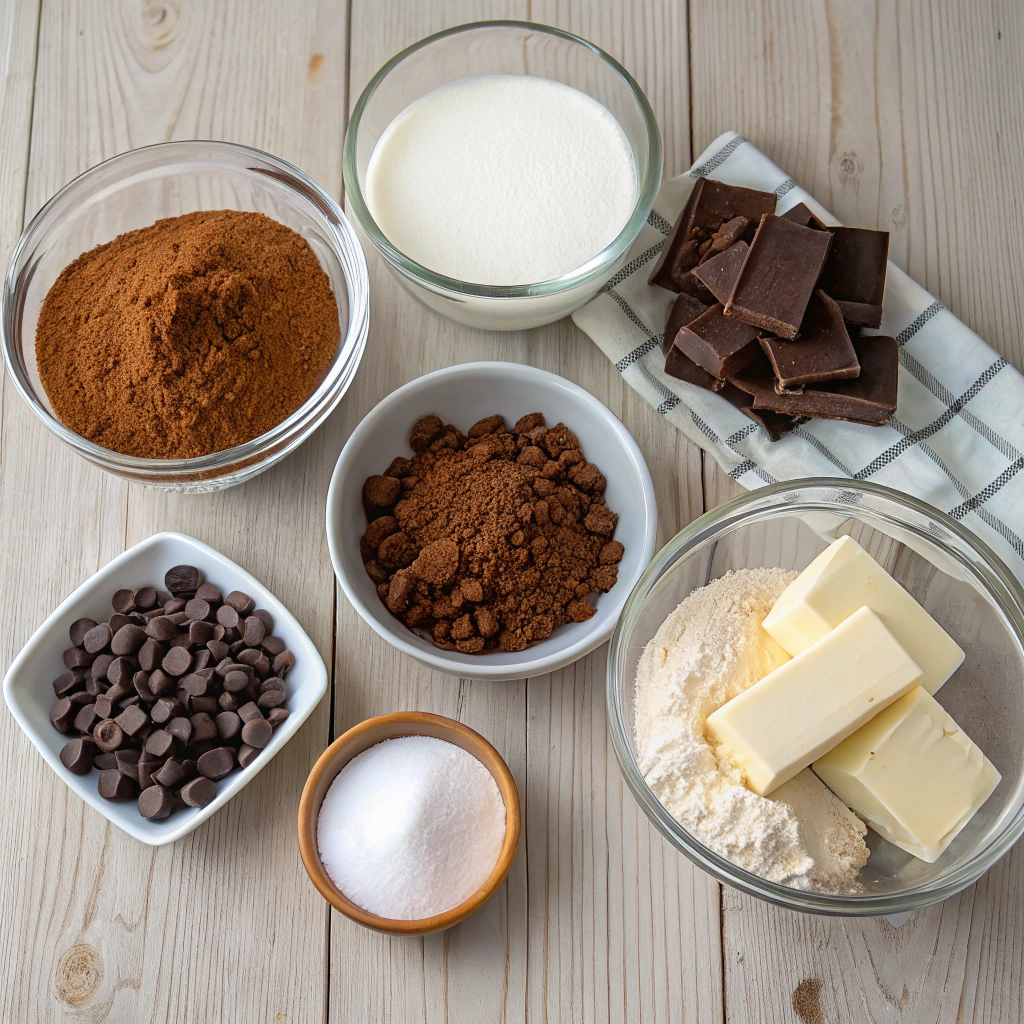
Gathering your ingredients for this classic tiffin recipe is like assembling a band where every member is a rockstar. You don’t need anything fancy, but each component plays a crucial role in creating that signature texture and taste.
The Dry Crunch (The Rhythm Section):
- 250g Digestive Biscuits: This is the foundation. Their malty, wheaty crunch is non-negotiable for authenticity. (Gluten-free digestives work perfectly too!).
- 100g Dried Fruit: Traditionalists swear by raisins or sultanas. But here’s my personal twist: a mix of dried cranberries and chopped apricots is a game-changer. It adds a lovely tartness.
The Sticky Binding (The Melody):
- 125g Unsalted Butter: The rich, creamy glue that holds everything together.
- 100g Golden Syrup: This is the secret weapon. It gives the tiffin its iconic chew and beautiful sheen. (If you’re in the US, light corn syrup is the closest substitute, though golden syrup has a more unique, caramel-like flavor).
- 50g Light Brown Soft Sugar: Adds a hint of molasses depth and extra chew.
The Chocolatey Heaven (The Lead Singer):
- 200g Milk Chocolate: Good quality chocolate makes a difference! I like to use a bar I’d enjoy eating on its own.
- 50g Dark Chocolate (70% cocoa solids): Adding a bit of dark chocolate balances the sweetness and gives the topping a more sophisticated, less cloying flavor. Trust me on this.
Optional Soloists (For The Encore):
- A handful of nuts like chopped walnuts or pecans for extra texture.
- A pinch of sea salt sprinkled over the melted chocolate to make the flavors pop.
Timing is Everything: A Dessert in a Dash
One of the biggest wins with this chocolate biscuit cake is its speed. We’re talking minimal effort for maximum reward.
- Preparation Time: 15 minutes (Yes, you read that right!)
- Setting Time: 2-3 hours in the fridge (The hardest part is waiting!)
- Total Time: About 3 hours, but 95% of that is hands-off.
Honestly, that’s over 50% less active time than preheating an oven and baking a cake. It’s the ultimate “I-need-dessert-now” lifesaver.
How to Make Chocolate Tiffin: The Foolproof Steps
Step 1: The Biscuit Bash
First, grab your digestives. You don’t want fine dust; you want a variety of chunks and crumbs for that perfect texture. Pop them into a sealed bag and roll a rolling pin over them. Alternatively, pulse them a few times in a food processor. Think “rustic,” not “powder.” Transfer them to a large mixing bowl and stir in your dried fruit (and nuts, if using).
Step 2: The Sticky Magic Act
Next, melt the butter, golden syrup, and brown sugar together in a medium saucepan over low heat. Stir it gently until the butter has melted and the sugar has dissolved into a gorgeous, glossy, caramel-hued lava. Please, don’t let it boil—you’re melting, not cooking. Once smooth, take it off the heat.
Step 3: The Grand Unification
Now, pour that glorious sticky liquid over the biscuit and fruit mixture. Get in there with a spatula and mix it all together until every last crumb is coated in that syrupy goodness. It should look and smell amazing already.
Step 4: Press and Prepare
Line a 20cm (8-inch) square tin with baking parchment. This is crucial for easy removal later! Tip your mixture into the tin and press it down firmly and evenly. I find using the bottom of a flat-ended glass helps to really compact it, which prevents your slices from crumbling when you cut them.
Step 5: The Chocolate Blanket
Time for the grand finale. Break your milk and dark chocolate into pieces and melt it gently. You can do this in a bowl over a pan of simmering water (a bain-marie) or in short bursts in the microwave, stirring between each burst to avoid scorching. Once smooth and glossy, pour it over the compressed biscuit base. Tilt the tin to spread the chocolate into an even layer.
Step 6: The Agonizing Wait
This is the test of your willpower. Pop the tin into the refrigerator for at least 2-3 hours, or until the chocolate topping is completely set and firm to the touch.
Step 7: Slice and Conquer!
Once set, lift the whole block out of the tin using the parchment paper. Place it on a cutting board and use a large, sharp knife to slice it into squares or bars. For super clean cuts, you can briefly warm the knife under hot water and dry it before slicing.
What’s Actually In This Deliciousness? A Nutritional Snapshot
Let’s be real, this is a treat, not a health food. But knowledge is power! Based on a typical recipe split into 12 servings, here’s a rough estimate:
- Calories: ~280-320 per square
- Fat: ~16g (A mix of saturated and unsaturated)
- Carbohydrates: ~35g (Including sugars from the syrup, chocolate, and fruit)
- Protein: ~3g
- Fiber: ~1g (Thanks to the biscuits and fruit!)
It’s an energy-dense snack, perfect for a sweet pick-me-up. Enjoy it mindfully!
Want to Make It a Bit Lighter? Healthier Swaps and Tweaks
You can absolutely tinker with this classic tiffin recipe to suit different dietary needs without sacrificing taste.
- Dairy-Free: Use a plant-based butter (block style works best) and ensure your chocolate is vegan-friendly.
- Reduced Sugar: Swap the golden syrup for a lower-sugar alternative syrup and use a sugar-free dark chocolate. The dried fruit will still provide natural sweetness.
- Gluten-Free: Simply use gluten-free digestive biscuits. They work identically!
- Nut-Free: This is naturally nut-free if you skip the optional add-ins. Always check your chocolate labels to be safe.
- Boost Nutrition: Add a couple of tablespoons of seeds (chia, pumpkin, or sunflower) or swap a portion of the fruit for chopped, dried figs or dates for more fiber.
How to Serve This No-Bake Wonder
A square of tiffin is sublime with a hot cup of tea or coffee—the bitterness of the drink cuts through the sweetness perfectly. But why stop there?
- The À La Mode: Serve a slightly warmed square with a scoop of good vanilla ice cream. The contrast between cold ice cream and the crunchy, room-temperature tiffin is magical.
- The Fancy Platter: Cut them into smaller, bite-sized pieces and arrange them on a platter for a party or afternoon tea. They always disappear first.
- The Lunchbox Hero: Wrap individual squares in parchment paper for a decadent lunchbox treat that won’t get soggy.
Don’t Make These Classic Chocolate Tiffin Mistakes!
I’ve made plenty of tiffin in my time, and I’ve learned from every error.
- Too Fine Crumbs: If you blitz the biscuits into dust, you’ll end up with a dense, dry block instead of a satisfyingly crunchy one. Chunks are your friend!
- Not Compacting the Base: Press, press, press! A firmly packed base holds together when sliced and gives a better mouthfeel.
- Overheating the Chocolate: Burnt chocolate is bitter and grainy. Melt it low and slow. If using a microwave, 20-second bursts are the way to go.
- Slicing Before It’s Set: Impatience leads to messy, crumbly squares. Let the chocolate fully set so you get those beautiful, clean edges.
Keeping Your Tiffin Perfect: Storing Tips
This treat is a dream to make ahead. Because of its low moisture content, it stores brilliantly.
- In an Airtight Container: It will keep perfectly at cool room temperature for up to 5 days. Honestly, it never lasts that long in my house.
- In the Fridge: You can store it in the fridge for up to two weeks. The chocolate will be firmer when cold.
- In the Freezer: Yes, you can freeze it! Individually wrap the squares and freeze for up to 3 months. Thaw at room temperature for an hour.
Ready to Become a Tiffin Legend?
See? I told you it was easy. This chocolate tiffin recipe is more than just a list of ingredients; it’s a story of ingenuity, a lesson in texture, and a guaranteed route to becoming everyone’s favorite baker (even though you didn’t technically bake!).
So, what are you waiting for? Grab those digestives and get crushing! I’d love to hear how you make it your own. Did you add ginger? A sprinkle of chili? Tell me all about your tiffin triumphs in the comments below!
Your Chocolate Tiffin Questions, Answered!
Can I use honey instead of golden syrup?
You can, but the flavor and texture will be different. Honey has a stronger floral taste and can make the tiffin a bit softer and stickier. Golden syrup is the traditional choice for a reason!
Why is my tiffin too crumbly and falling apart?
This usually means you didn’t press the mixture firmly enough into the tin, or you may have needed a tiny bit more of the butter/syrup mixture. Make sure to really compact it next time!
What’s the difference between tiffin and rocky road?
A great question! While similar, rocky road typically contains marshmallows and often nuts, giving it a softer, chewier texture. Tiffin is all about the biscuit crunch and is usually held together with the syrup/butter mix rather than just melted chocolate.
My chocolate topping cracked when I cut it. What happened?
This can happen if the chocolate is too cold. Let the slab sit at room temperature for 10-15 minutes before slicing. Using a sharp, warm knife also helps immensely.
Is chocolate tiffin suitable for kids to make?
Absolutely! It’s a fantastic, no-bake recipe for kids to help with. They’ll love crushing the biscuits and mixing everything together. Just supervise them during the melting steps.