Introduction
Ever wondered why your victoria sponge recipe sometimes turns out more like a delicious doorstop than a light, airy cloud of cake? You’re not alone. I’ve been there, staring at a sunken middle, wondering what on earth went wrong. But here’s a little secret I learned the hard way: baking a perfect, light cake every time isn’t about magic; it’s about method. And who better to trust than the undisputed queen of baking, Mary Berry? Her classic Victoria sponge recipe is the gold standard for a reason. It’s simple, elegant, and when you get it right, it’s an absolute show-stopper. Honestly, mastering this recipe felt like unlocking a secret level in baking. Let’s get started.
The Non-Negotiable Ingredients for Sponge Success
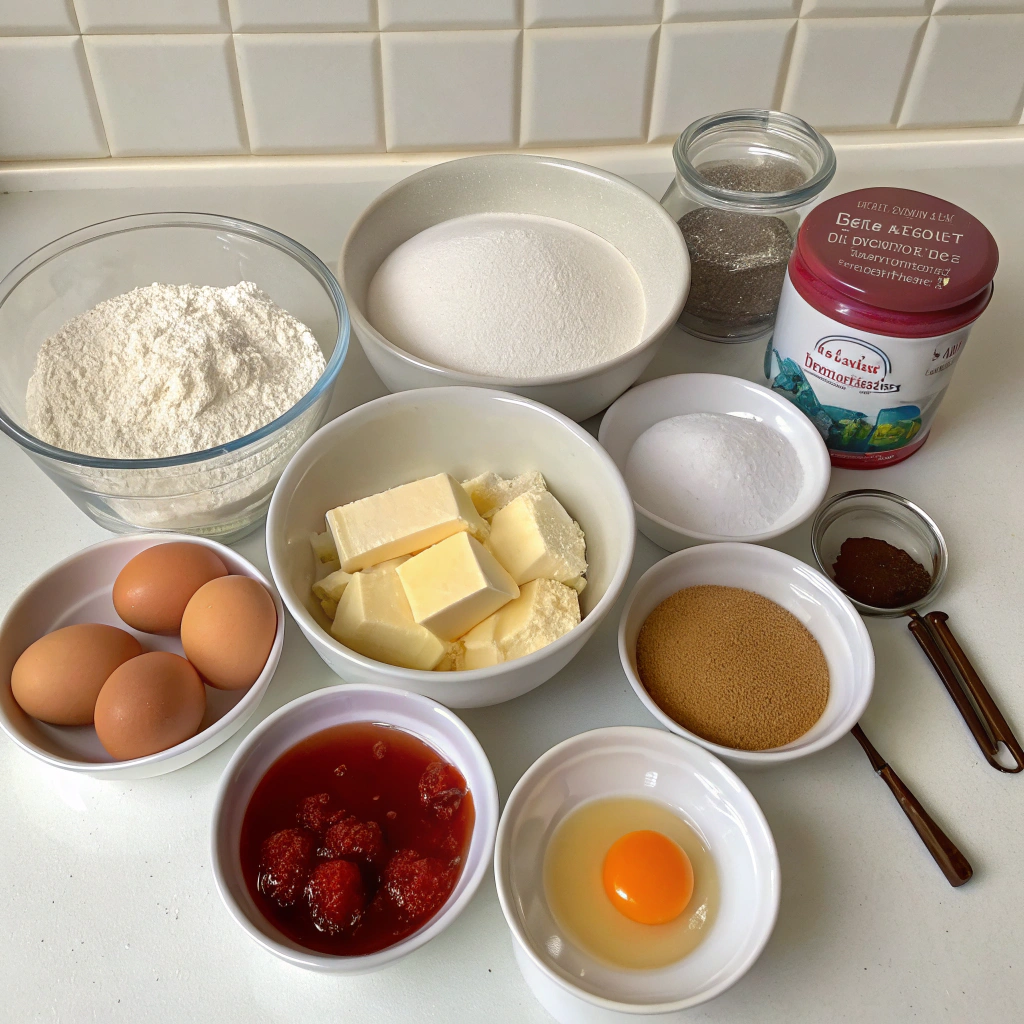
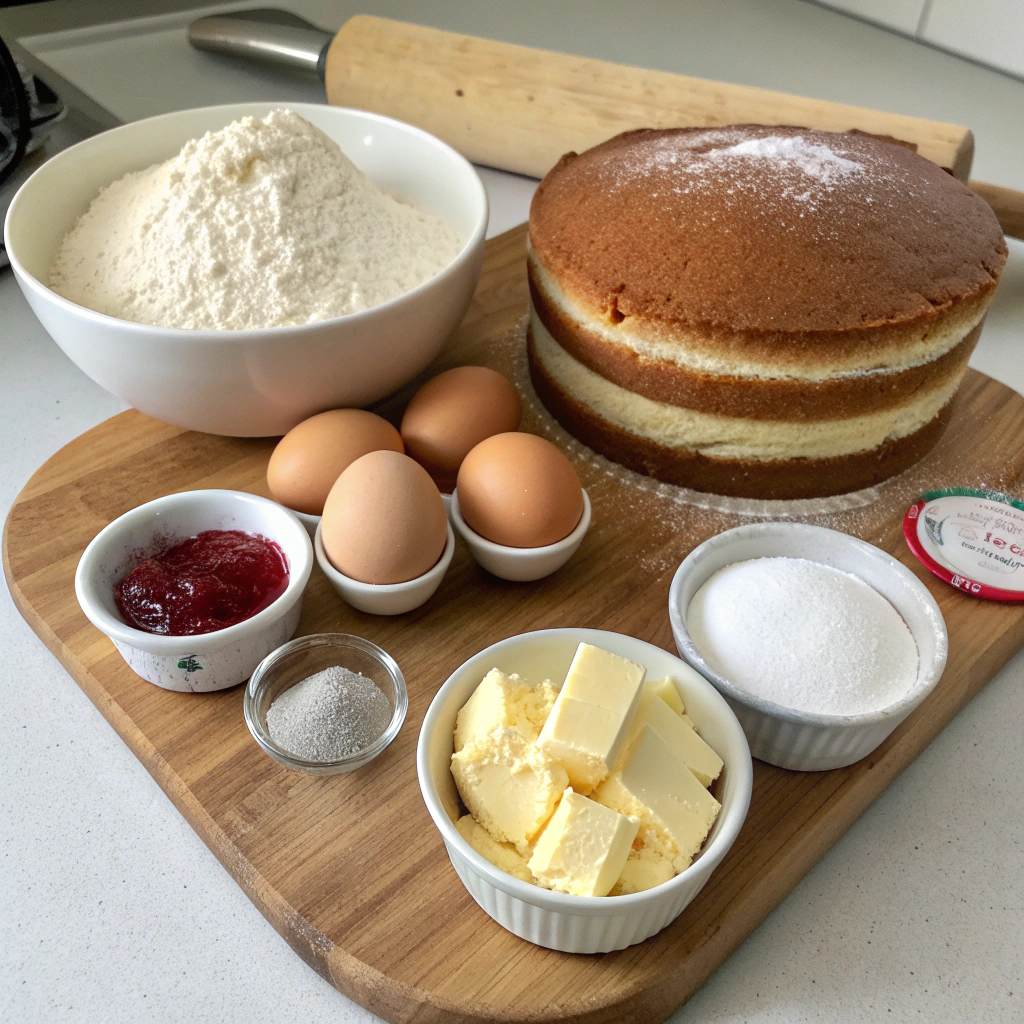
First things first, you can’t build a palace with shaky bricks. The ingredients for this mary berry victoria sponge are simple, but their quality is everything. This isn’t the time to cut corners! Mary’s philosophy is all about precision and using the best you can find.
- Softened Unsalted Butter: This is the foundation of your cake’s flavor and texture. I can’t stress this enough – it must be softened. Not melted, not cold. Think “cool room temperature.” Poke it. It should yield easily without being greasy. My go-to trick? Leave it out for a good hour before you start. If you’re in a pinch, cut it into small cubes—it’ll soften faster.
- Caster Sugar: Finer than granulated, caster sugar dissolves more easily into the butter, which is key for that light, non-grainy texture. If you don’t have any, just blitz regular granulated sugar in a food processor for 30 seconds. Boom, homemade caster sugar.
- Large Free-Range Eggs: Always bring your eggs to room temperature! A cold egg hitting softened butter is a recipe for a curdled, split mixture. It’s the most common mistake! Trust me, I’ve ruined many a cake batter by being impatient.
- Self-Raising Flour: The workhorse that gives the cake its lift. Make sure your flour is fresh. Baking powder loses its oomph over time. For a foolproof result, some bakers even add an extra teaspoon of baking powder, but Mary’s classic ratio is perfect as is.
- Baking Powder: Yes, even with self-raising flour, a little extra boost ensures a magnificent rise. Just don’t go overboard!
- Good-Quality Raspberry Jam: This is personal, but for me, a seedless raspberry jam is the classic choice. It spreads smoothly without getting stuck in your teeth! Of course, strawberry works beautifully too.
- Whipped Double Cream: The luxurious filling. Don’t use whipped topping from a can, please! Go for the real deal. Chill your bowl and whisk beforehand for the best, stiff peaks.
So, How Long Are We Talking?
Let’s be real, we all check the timing first. The good news? This is a surprisingly quick bake!
- Preparation Time: 15-20 minutes (Honestly, once you’ve made it a few times, you’ll do it in 10!)
- Cooking Time: 20-25 minutes
- Cooling Time: This is the hardest part… about 30-45 minutes.
- Total Time: Roughly 1 hour 15 minutes from start to finish. That’s nearly 30% less faffing about than many other fancy cake recipes!
Your Step-by-Step Guide to Baking Bliss
This is where the magic happens. Follow these steps like your cake depends on it (because it does!).
Step 1: The All-Important Prep Work
Preheat your oven to 180°C (160°C Fan)/350°F/Gas 4. Now, grease two 20cm (8-inch) sandwich tins with a little butter, then line the bases with baking parchment. This is your insurance policy against stuck cakes. Do not skip it! I learned that lesson the messy way.
Step 2: The Creaming Method is King
Place your beautifully softened butter and the caster sugar into a large, roomy bowl. Now, using an electric hand whisk or a stand mixer, beat them together until the mixture turns pale, fluffy, and almost white. This is not just mixing; you’re trapping tiny air bubbles that will make your cake light. This should take a good 3-5 minutes. Don’t rush it! Scrape down the sides of the bowl halfway through.
Step 3: The Egg-cellent Addition
Crack your room-temperature eggs into a separate jug and beat them lightly with a fork. Now, add them to the butter-sugar mixture a little at a time, beating well after each addition. If the mixture starts to look a bit curdled (it happens to the best of us!), just add a tablespoon of your flour and beat it in. It’ll come right back together.
Step 4: Bringing It All Together
Sift the self-raising flour and baking powder together directly over the bowl. Yes, sifting! It aerates the flour, making your final cake even lighter. Using a large metal spoon or a spatula, gently fold the flour into the wet mixture. Be kind to the batter—no beating! You want to keep all that precious air in. Fold until you can’t see any streaks of flour.
Step 5: Divide and Conquer
Divide the lovely, smooth batter equally between your two prepared tins. I like to weigh the tins to be super precise. Gently smooth the tops with the back of your spoon to make them even.
Step 6: Into the Oven!
Pop the tins into the center of your preheated oven and bake for 20-25 minutes. Do NOT open the oven door before 20 minutes are up! The sudden drop in temperature can cause a collapse. You’ll know they’re done when the cakes are golden, spring back when lightly pressed, and have just started to shrink away from the sides of the tin.
Step 7: The Cool Down
Take the tins out and leave the cakes to cool in the tins for about 5 minutes. Then, run a knife around the edge and turn them out onto a wire rack. Carefully peel off the parchment paper and let them cool completely. A warm cake will melt your cream and jam—a delicious mess, but not the elegant look we’re going for!
Step 8: The Grand Assembly
Once completely cool, it’s time for the fun part. Place one cake, top-side down, on your serving plate. Spread a thick, even layer of your gorgeous raspberry jam over the surface. Next, spread the softly whipped double cream over the jam. Gently place the second cake on top (top-side up, so you have a nice flat base and a domed top). Finally, dust the top liberally with icing sugar. And there you have it. Perfection.
What Are You Actually Eating? (The Nutritional Lowdown)
Let’s be real, this is a treat. A glorious, wonderful treat. But it’s good to know what’s in it! Based on standard ingredients and 12 slices, a typical serving contains approximately:
- Calories: ~380 kcal
- Fat: ~22g
- Saturated Fat: ~13g
- Carbohydrates: ~42g
- Sugars: ~27g
- Protein: ~5g
It’s a dessert, not a health food. But life is all about balance, right? Enjoying a slice of something made with love and real ingredients is good for the soul.
Want to Make It a Bit Lighter? Healthier Swaps!
Want to feel a little less guilty? You can tweak the classic mary berry victoria sponge without sacrificing too much flavor.
- Butter: You can use a good-quality margarine spread specifically designed for baking. The results can be surprisingly good and it often lowers the saturated fat content.
- Cream: Swap the double cream for whipped extra-thick Greek yogurt or a light whipped cream alternative. The tang of Greek yogurt actually pairs really well with the sweet jam.
- Sugar: While you can’t reduce the sugar too much without affecting the structure, you can use a sugar alternative designed for baking. Just check the packaging for conversion ratios.
- Flour: For a fibre boost, you can replace up to half of the self-raising flour with wholemeal self-raising flour. It’ll give the cake a slightly nuttier, denser texture, but it’s still delicious.
Serving It Up in Style
This cake is the star of any show, but how you present it can make it even more special.
- The Classic Afternoon Tea: Cut into elegant wedges and serve on a cake stand alongside a pot of freshly brewed English Breakfast tea. Pinkies out optional, but encouraged.
- Summer Berry Bonanza: Serve each slice with a handful of fresh raspberries or strawberries on the side. The fresh fruit cuts through the richness beautifully.
- The Celebration Cake: Add some fresh flowers (food-safe ones like violets or pansies!) or a few edible gold leaf flakes on top for a real celebratory vibe.
- With a Cuppa: Honestly, it’s perfect just on its own with a mug of coffee or tea. It doesn’t need any fuss.
I’ve Messed Up Before: Common Mistakes to Avoid
Learn from my errors so you don’t have to make them yourself!
- Cold Ingredients: This is the #1 reason for a dense cake. Your butter and eggs MUST be at room temperature. It makes all the difference in the world.
- Not Creaming Long Enough: If you don’t beat the butter and sugar until it’s pale and fluffy, you’re not incorporating enough air. Your cake will be heavy.
- Overmixing After Adding Flour: As soon as you add the flour, you must switch to folding. Overmixing develops the gluten in the flour, leading to a tough, rubbery texture. Gentle does it.
- Opening the Oven Door Too Early: The heat shock can make the center of the cake collapse. Be patient! Use the oven light to check on progress.
- Filling a Warm Cake: The heat will cause the cream to melt and the jam to slide right out. Wait until the cakes are completely cool. No exceptions.
Making It Ahead: Storing Your Masterpiece
So you baked a masterpiece, but you can’t eat it all at once (or can you?).
- Unfilled Cakes: The unfilled sponge layers can be baked ahead of time. Once cooled, wrap them tightly in cling film and store at room temperature for up to 2 days, or freeze for up to a month. Defrost at room temperature before assembling.
- The Full Monty: Once filled and cream has been added, the cake must be stored in the fridge because of the dairy. Keep it in an airtight container and consume within 2 days.
- A Note on the Icing Sugar: The icing sugar on top will gradually dissolve into the cake in the fridge. I always dust it with a fresh snowfall of sugar just before serving.
Ready to Bake Your Own?
See? Baking a perfect, light cake every time with Mary Berry’s classic Victoria sponge recipe is totally achievable. It’s not about being a master chef; it’s about following the rules, respecting the ingredients, and adding a dash of love. This recipe has never let me down, and I know it won’t let you down either.
So, what are you waiting for? Preheat that oven, grab your ingredients, and create something wonderful. I’d love to hear how you get on! Did it rise to glorious heights? Did it become an instant family favourite? Drop a comment below and share your baking triumphs (or even your funny disasters—we’ve all had them!). And if you’re looking for another classic challenge, why not try your hand at a perfect lemon drizzle cake next?
Your Victoria Sponge Questions, Answered! (FAQs)
Q: Can I use all-purpose flour instead of self-raising?
A: You can, but you MUST add leavening. For every 150g of all-purpose flour, add 2 teaspoons of baking powder and sift them together well.
Q: Why did my cake sink in the middle?
A: This usually happens for one of three reasons: 1) The oven door was opened too early, 2) The cake was underbaked, or 3) Too much raising agent was used, causing it to rise too quickly and then collapse.
Q: My mixture curdled when I added the eggs! Is it ruined?
A: Absolutely not! Don’t panic. Just add a spoonful of your flour and beat it in. It should bring the mixture back together. The final cake will still be delicious.
Q: Is there a dairy-free alternative for this recipe?
A: Yes! You can use a plant-based butter block (not a spread) and a dairy-free whipping cream alternative. For the eggs, a commercial egg replacer works best here rather than a simple flax egg, as you need the structure.
Q: Can I make this into one large cake?
A: It’s not recommended. The beauty of using two tins is that the heat circulates evenly around the thinner layers, baking them through perfectly. One deep tin would result in a cake that’s overcooked on the outside and raw in the middle.