
Okay, let’s be real for a second. You bought that shiny new air fryer promising restaurant-quality crispiness with a fraction of the oil. You followed a recipe for Air Fryer Wings to the letter, but instead of that satisfying, audible CRUNCH, you got… well, steamed chicken skin. It’s a culinary heartbreak we’ve all faced. But what if I told you that achieving that perfect, crackly-crisp exterior isn’t about magic, but about a few simple, science-backed secrets? Honestly, after my own tragic batch of flabby wings, I went on a deep dive, tested a zillion methods, and finally cracked the code. Let’s dive in and turn your wing game around forever.
What You’ll Need: Gathering Your Crispy Wing Arsenal
Think of this like gathering your superhero gear. Each ingredient plays a specific role in the quest for ultimate crispiness. Here’s your shopping list for these epic Garlic Parmesan Air Fryer Recipes:
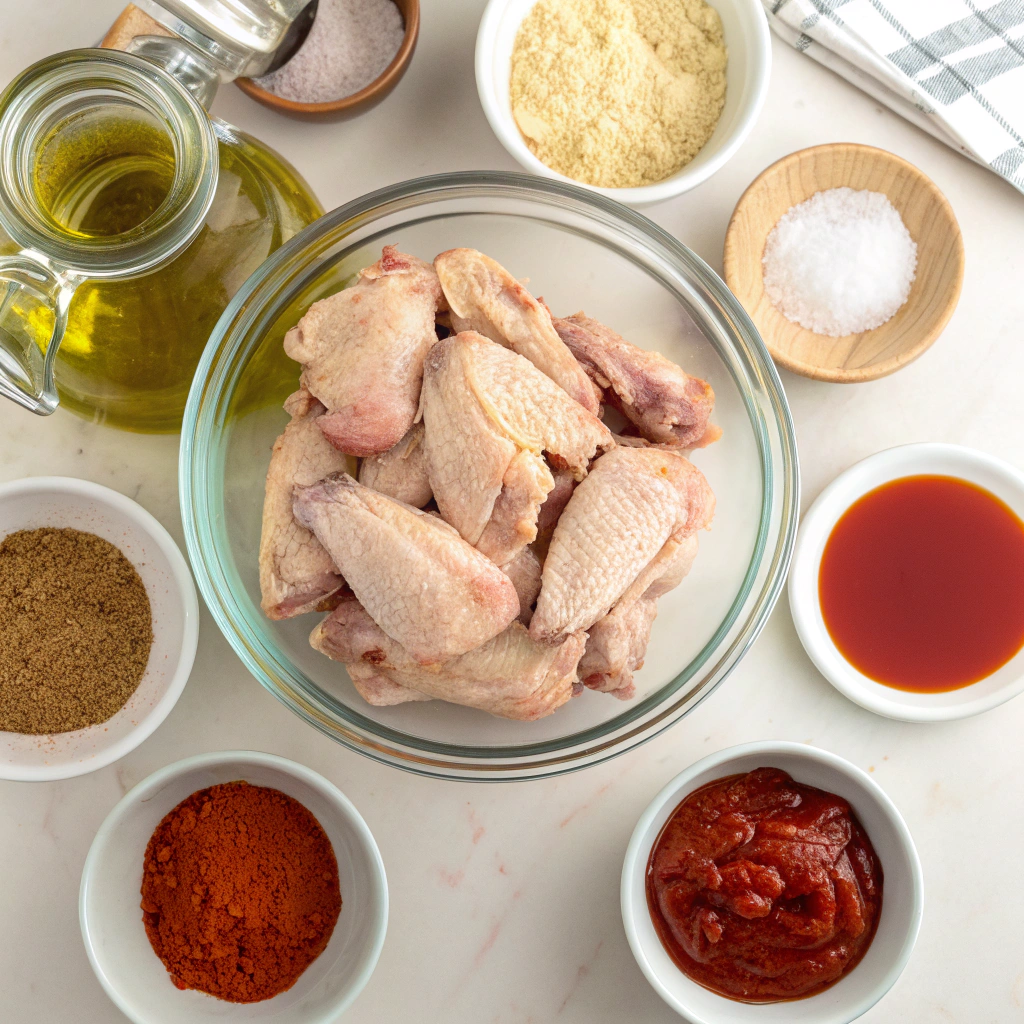
- Chicken Wings: About 2 pounds. I’m a huge fan of getting whole wings and cutting them into drumettes and flats myself—it’s cheaper and you get more control. But pre-cut party wings are a totally fine time-saver!
- Baking Powder: THIS is the #1 secret weapon. Not baking soda—aluminum-free baking powder. This is non-negotiable. It’s a chemical drying agent that changes the pH of the skin, helping it pull away moisture and blister into an incredibly crispy shell. It’s the science hack that will blow your mind.
- Kosher Salt & Black Pepper: The fundamental building blocks of flavor. Kosher salt adheres better than fine table salt.
- Garlic Powder & Onion Powder: For that deep, savory, allium base note that makes the Parmesan coating sing.
- Paprika: Just a touch for a hint of sweetness and that gorgeous golden color.
- For the Garlic Parmesan Sauce:
- Unsalted Butter: 4 tablespoons, melted. This is our sauce base for richness and helping the seasoning cling.
- Fresh Garlic: 3-4 cloves, minced. Fresh is essential here! It provides a pungent, aromatic kick that powdered garlic just can’t match.
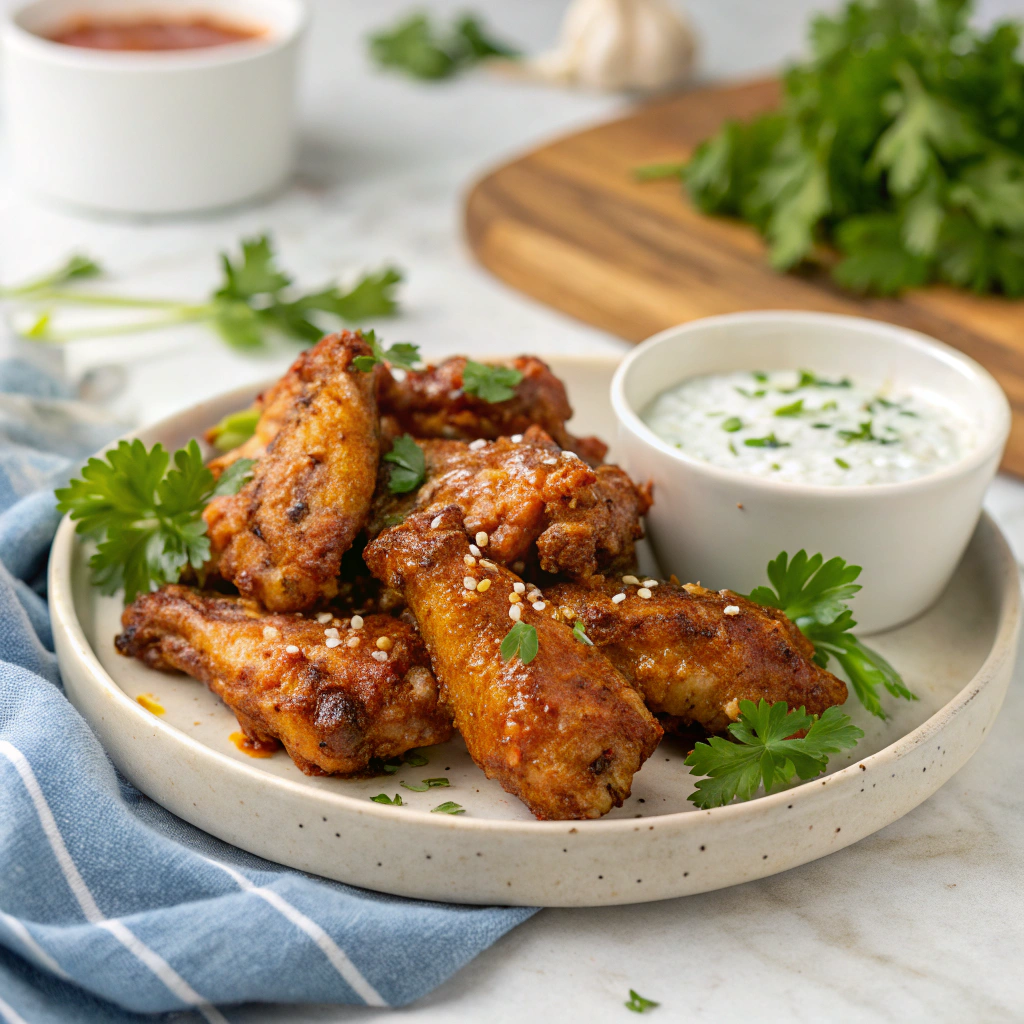
- Fresh Parsley: Chopped, for a bright, fresh finish.
- Grated Parmesan Cheese: The good stuff! Please, for the love of crispy wings, grab a wedge of Parmigiano-Reggiano or Grana Padano and grate it yourself. The pre-shredded stuff in a canister contains anti-caking agents that prevent it from melting smoothly into the sauce.
See? Nothing crazy. The magic isn’t in a long list of ingredients, but in how you use them.
Timing is Everything: Your Roadmap to Wing Heaven
Let’s talk timeline. One of the biggest myths about Air Fryer Wings is that they’re a 10-minute affair. For true crispiness, you need a tiny bit of patience—but it’s still worlds faster than deep frying.
- Prep Time: 10 minutes (plus optional 30-minute dry brine)
- Cook Time: 24-28 minutes
- Total Time: About 40-50 minutes
Compared to the 45-60 minutes of babysitting a pot of boiling oil, this method is about 40% faster and infinitely safer and cleaner. Time well spent, if you ask me.
Your Step-by-Step Guide to Crispy Perfection
Step 1: The Critical Dry Brine (Don’t Skip This!)
Pat your wings completely dry with paper towels. I mean, bone-dry. Any surface moisture is the enemy of crispiness. Then, in a large bowl, toss them with 1 tablespoon of baking powder, 1 ½ teaspoons of kosher salt, pepper, garlic powder, and paprika. By the way, this isn’t just seasoning—it’s the start of the chemical reaction for crispiness. Arrange them on a wire rack set over a baking sheet (this allows air to circulate all around them) and pop them in the fridge, uncovered, for at least 30 minutes or up to 8 hours. This dry-brine step pulls even more moisture to the surface to evaporate. Trust me on this.
Step 2: The First Cook – Low and Slow
Preheat your air fryer to 380°F (190°C). This is key! A hot air fryer means immediate cooking and less steaming. Arrange the wings in a single layer in the basket—do not overcrowd them. This is probably the second most common mistake. Work in batches if you have to. Cook for 13-15 minutes. This first phase is about rendering out the fat and slowly cooking the skin to start getting tender on the inside.
Step 3: The Power of the Flip
Pull the basket out and flip each wing. This ensures even cooking and browning on all sides. It’s a little tedious, but so worth it for that uniform golden crunch.
Step 4: The Final Blast – High and Fast
Now, crank the heat up to 400°F (200°C). Cook for another 11-13 minutes, until the wings are deeply golden brown, crispy, and cooked through. The sound will change from a sizzle to a faint crackle—that’s your audio cue that they’re done!
Step 5: The Flavor Bomb Coat
While the wings are on their final blast, whip up the sauce. Melt the butter and stir in the minced fresh garlic and parsley. As soon as the wings come out of the air fryer, put them in a large bowl. Pour the garlic butter over them and toss to coat evenly. Now, while they’re still hot, shower them with your freshly grated Parmesan cheese and toss again. The residual heat will gently wilt the parsley and mellow the raw garlic just perfectly.
Let’s Talk Nutrition: Indulgence with Insight
I’m not going to tell you these are health food, but compared to traditional deep-fried wings? It’s a game-changer. Here’s the scoop per serving (approx. 1/4 of the recipe):
- Calories: ~420
- Fat: 28g
- Saturated Fat: 12g
- Protein: 35g
- Carbohydrates: 3g
- Sodium: 980mg
The beauty of this Air Fryer Wings method is that it uses up to 75% less oil than deep frying. You’re getting all the flavor and texture with a significantly reduced fat content. The protein content is fantastic, making these a more macro-friendly option for game day or a fun dinner.
Want a Healthier Twist? Let’s Get Creative!
You can absolutely lighten these up without sacrificing that coveted crunch!
- Swap the Sauce: Instead of a butter base, use a mix of 2 tablespoons of light olive oil and 2 tablespoons of Greek yogurt for a creamy, tangy, and lighter garlic-Parmesan sauce.
- Go Dairy-Free: Use a high-quality vegan Parmesan cheese and swap the butter for avocado oil or a plant-based butter alternative. The crispiness of the wing itself remains untouched!
- Reduce Sodium: Easily cut the salt in the dry brine by half if you’re watching your sodium intake. The Parmesan sauce will still provide plenty of salty, savory flavor.
How to Serve These Bad Boys
These wings are the star of the show, so keep the sides simple and complementary.
- The Classic Trio: A big bowl of cool, creamy ranch dressing, some crisp celery sticks, and carrot sticks. It’s a classic for a reason—the coolness cuts through the richness perfectly.
- Loaded Fries: Pile these wings right on top of a batch of air-fryer fries, drizzle with extra sauce, and more Parmesan. You’re welcome.
- For a Full Meal: Serve them alongside a simple arugula salad with a lemon vinaigrette to balance the meal. The peppery arugula is a fantastic contrast.
Common Mistakes That Lead to Soggy Disaster
I’ve made these so you don’t have to! Learn from my errors:
- Skipping the Baking Powder: This is the biggest mistake. Baking powder is the crispy catalyst. Without it, you’re just baking wings.
- Not Drying the Wings: Water on the skin = steam = soft skin. Pat them dry like your crispy dinner depends on it (because it does).
- Overcrowding the Basket: If the wings are piled on top of each other, the hot air can’t circulate. They’ll steam instead of crisp. Batch cooking is always better than a soggy pile.
- Saucing Too Early: Never toss wings in a wet sauce before air frying. Always cook them naked and crispy first, then sauce them. This keeps the exterior perfectly crisp.
Keeping the Crisp: Storing Your Leftovers (If You Have Any!)
Let’s be honest, leftovers are unlikely. But if you’re a meal-prepper or miraculously have some left:
- Let them cool completely before storing. Putting hot wings in a container creates condensation, which immediately makes them soggy.
- Store in an airtight container in the fridge for up to 3 days.
- To Reheat: Do not microwave them! That will make them rubbery. To bring back the crisp, reheat them in your air fryer at 375°F for 3-4 minutes until hot and crispy again. It works shockingly well.
Ready to Become a Wing Master?
See? Getting the crispiest possible Air Fryer Wings isn’t about a fancy machine—it’s about understanding the simple techniques that make it happen. That baking powder dry brine is the ultimate game-changer. So, what are you waiting for? Channel your inner chef, grab that baking powder, and get ready to make the best wings of your life.
I’d love to hear how it goes! Did the baking powder trick blow your mind? Did your family go crazy for them? Drop a comment below and share your wing victory story! And if you’re hooked on the magic of the air fryer, check out our ultimate guide to Air Fryer Recipes for more inspiration.
Frequently Asked Questions (FAQs)
Q: Can I use frozen wings in the air fryer?
A: You can, but for the crispiest results, I highly recommend thawing them completely first. Pat them extremely dry, then proceed with the baking powder and seasoning step. Cooking from frozen will result in a softer skin as the released moisture steams the wing.
Q: Why did my wings smoke up the air fryer?
A: This usually happens because of rendered fat dripping onto the heating element. To prevent this, make sure your air fryer is clean before you start, and you can place a small amount of water in the bottom of the drawer (below the basket) to prevent the fat from smoking. Also, trimming off any excess loose skin or fat helps.
Q: Can I make these wings without baking powder?
A: You can, but they will not be nearly as crispy. The baking powder is a chemical catalyst that promotes browning and blistering. Without it, you’ll get a more traditionally baked texture—still tasty, but not that crackly, deep-fried-like crunch.
Q: My air fryer is small. What’s the best way to cook for a crowd?
A: Batch cooking is your best friend! Keep the first batch warm on a wire rack set on a baking sheet in a 200°F (95°C) oven while you cook the subsequent batches. This keeps them warm and crispy until you’re ready to sauce and serve them all at once.

Leave a Reply
You must be logged in to post a comment.