
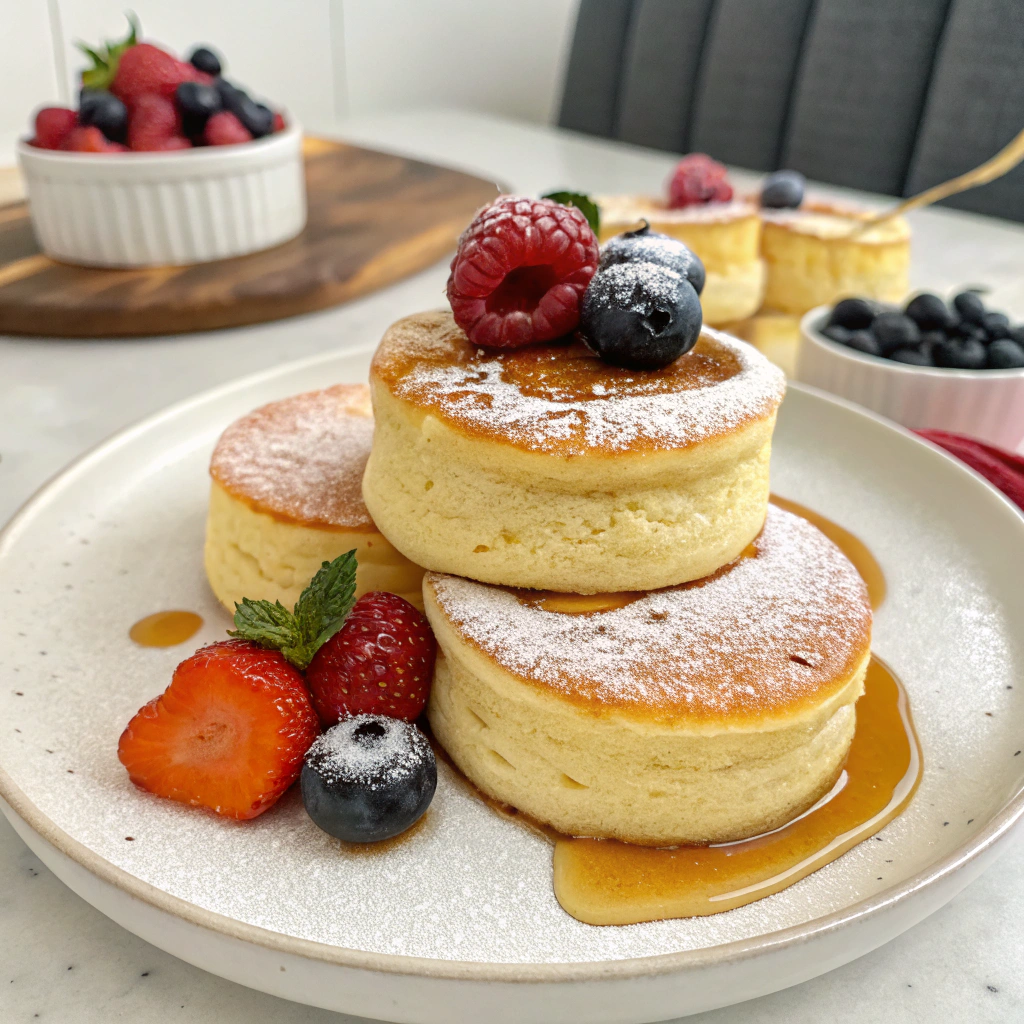
Ever spent what feels like a lifetime carefully folding egg whites, only to watch your beautiful Japanese Souffle Pancakes transform into sad, flat disks the moment they hit the plate? You’re not alone. I’ve been there, staring into the abyss of a deflated pancake, wondering where it all went wrong. Honestly, it’s a culinary heartbreak that’s far too common. But what if I told you that achieving those cloud-like, jiggly masterpieces you see all over Instagram isn’t just for pastry chefs in Tokyo? It’s totally possible in your own kitchen, and I’m going to give you the seven secrets that finally made me a souffle pancake hero.
Let’s dive in.
Gathering Your Cloud-Making Toolkit: The Ingredients
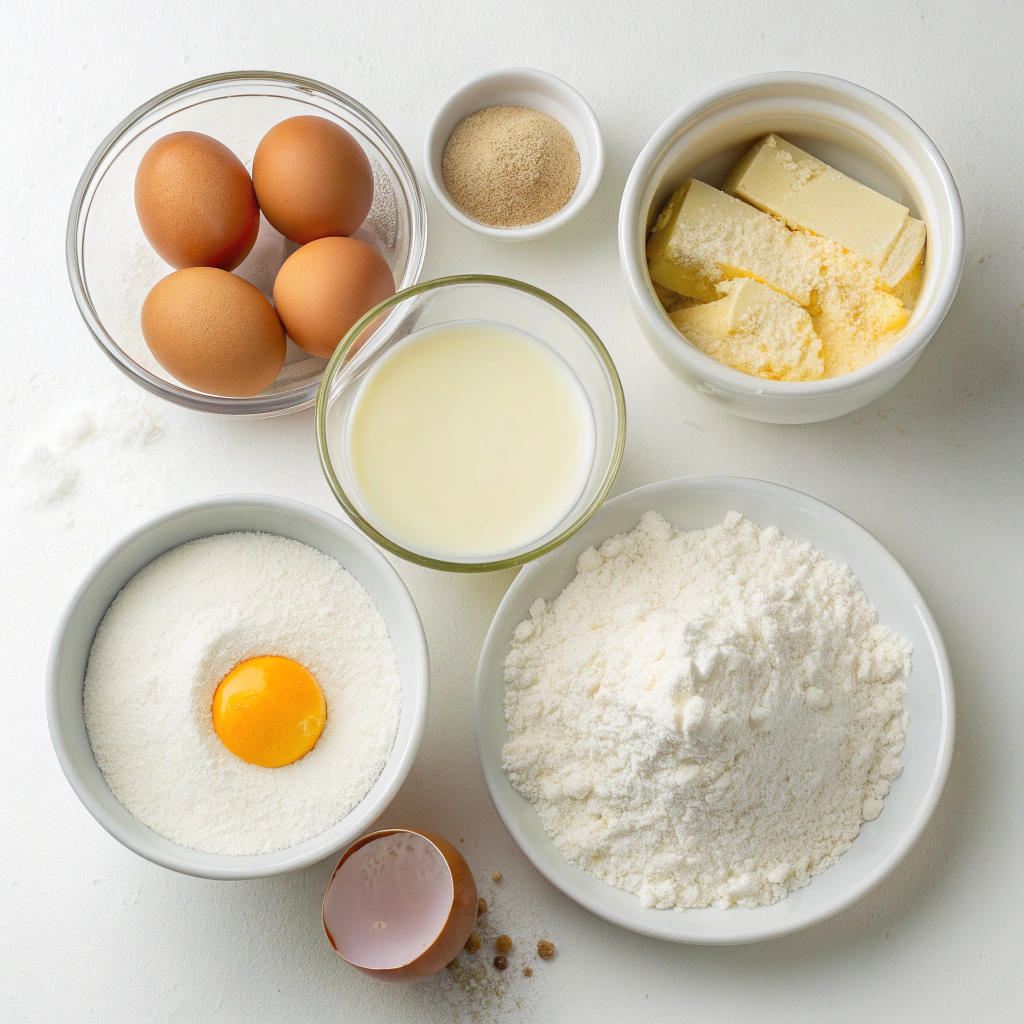
Think of this like a science experiment where the result is delicious. Precision is your best friend here. You can’t just eyeball this stuff and hope for the best.
- Eggs: The undisputed stars of the show. You MUST separate them cold (it’s way easier), but then let the whites come to room temperature. Warmer whites whip up with more volume and stability—it’s non-negotiable.
- Cake Flour: This is my secret weapon. Its lower protein content compared to all-purpose flour gives you that tender, delicate crumb that’s essential. If you’re in a pinch, you can make a DIY version: for every 1 cup of all-purpose flour, remove 2 tablespoons and replace it with 2 tablespoons of cornstarch. Sift it together. Voila!
- Whole Milk & Greek Yogurt: I use a combination. The milk adds richness, and the Greek yogurt (or full-fat sour cream) provides a slight tang and fat content that helps stabilize the batter. It’s like a safety net for your air bubbles.
- Cream of Tartar: This is the guardian angel of your meringue. It stabilizes the egg whites, making them less likely to collapse and weep. A little bit goes a very long way. If you don’t have it, a tiny drop of lemon juice or white vinegar can work in a pinch, but cream of tartar is superior.
- Granulated Sugar: We’re adding this gradually to the egg whites to help form a strong, glossy meringue. It’s not just for sweetness; it’s a structural component.
- Vanilla Extract & Melted Butter: For that gorgeous, classic flavor. Use real vanilla if you can. It makes a difference.
How Long Will This Culinary Magic Take?
Let’s be real: these aren’t your 5-minute flapjacks. Good things take time, and these are very, very good things.
- Prep Time: 20 minutes (This includes all that careful sifting and egg-white whipping)
- Cook Time: 15-20 minutes (This is per batch, and low and slow is the name of the game)
- Total Time: About 40 minutes
Is it worth it? A hundred percent. It’s a weekend project, a special occasion showstopper, or the ultimate “I-care-about-you” Breakfast Ideas. By the way, the active hands-on time isn’t bad—it’s mostly waiting patiently for them to cook to perfection.
Step-by-Step: Your Path to Pancake Glory
Step 1: Separate Those Eggs Like a Pro
Cold eggs separate more cleanly, reducing the chance of any yolk getting into your whites. Even a speck of fat (like yolk) can sabotage your meringue. I use three small bowls: one for the yolks, one for the whites, and a third main mixing bowl. I separate each white into the small bowl first, *then* transfer it to the main bowl. This way, if I break one yolk, I don’t ruin the entire batch of whites. Trust me, this little trick saves tears.
Step 2: Whip the Whites into a Stiff, Glossy Peak
This is the most critical step. Add the cream of tartar to your room-temperature egg whites and start whipping on medium speed. Once they’re frothy, gradually add the sugar, a tablespoon at a time. Once all the sugar is in, crank the speed to high and whip until you have stiff, glossy peaks. What does that mean? The peaks should stand straight up when you lift the whisk out of the bowl, and the meringue should look smooth and glossy, not grainy. Don’t overwhip until it looks clumpy and dry!
Step 3: Gently, Gently Fold the Batter
The keyword here is *gentle*. You’ve created all these beautiful air pockets; now you don’t want to pop them. Add your yolk mixture to the meringue in two parts. Use a spatula and cut through the center of the batter, sweep along the bottom, and fold it over on top. Rotate the bowl a quarter turn and repeat. This isn’t stirring! It’s a careful, patient incorporation. The batter should be mostly uniform with no big streaks of white, but a few tiny streaks are okay. It’s better to be under-mixed than over-mixed.
Step 4: The Low and Slow Cook
This is where most people fail. You cannot cook these on medium-high heat. Grease your ring molds (or free-form if you’re brave) and place them in a non-stick pan with a lid. Add a couple of teaspoons of water to the pan *away from the pancakes*, then immediately cover. The steam is crucial! It helps the pancakes cook through without burning the bottom. We’re talking low heat for a good 6-8 minutes on the first side. Patience, young grasshopper.
Step 5: The Confident Flip
This is terrifying, I know. But you’ve got this. Slide a thin, flexible spatula underneath, gently loosen it, and with a quick, confident motion, flip it over. Don’t hesitate! Add another teaspoon of water for steam, cover, and cook for another 5-6 minutes. The second side always cooks faster.
Step 6: The Toothpick Test
The ultimate truth-teller. Insert a toothpick into the center of a pancake. If it comes out clean, with no wet batter, they’re done. If not, give them another minute with the lid on.
Step 7: Serve Immediately (But Be Patient for One Second!)
Get them on a plate, dust with powdered sugar, and add a pat of butter and syrup. But here’s my controversial opinion: let them sit for exactly 60 seconds before digging in. This allows the interior to set just a tiny bit more, making them less likely to completely collapse under the weight of your toppings. They’ll still be impossibly light and airy, I promise.
What Are You Actually Eating? A Nutritional Snapshot
Let’s be transparent. These are a treat. They’re made with eggs, sugar, and flour—they’re not a salad. But that’s okay! Life is about balance. Here’s a rough breakdown per pancake (assuming a batch of 4 large pancakes):
- Calories: ~250-300
- Protein: ~7g (Thanks, eggs!)
- Carbohydrates: ~30g
- Fat: ~10g
- Sugar: ~15g
Want a Healthier Twist? Let’s Get Creative.
You can absolutely tweak this recipe to fit your dietary needs without sacrificing too much fluffiness.
- Gluten-Free: Swap the cake flour for a 1:1 gluten-free baking blend. I’ve had great success with brands that contain xanthan gum.
- Lower Sugar: You can reduce the granulated sugar in the meringue by about 25%. I wouldn’t go further, as the sugar is key for structure. Serve with fresh berries instead of syrup to keep the overall sugar content down.
- Dairy-Free: Use a plant-based milk (oat milk works great) and replace the Greek yogurt with a dollop of dairy-free yogurt or even applesauce. For the butter, use a neutral oil like avocado or melted coconut oil.
How to Serve These Epic Pancakes
The classic way is a dusting of powdered sugar and a drizzle of maple syrup. But why stop there?
- Berry Bliss: Top with a compote of fresh macerated strawberries and a dollop of whipped cream.
- Tropical Escape: Toasted coconut flakes, sliced mango, and a passion fruit curd. Trust me on this.
- Decadent Dessert: A scoop of vanilla ice cream and a hot chocolate sauce turns them into an unforgettable dessert.
- The Simple Elegance: Just a pat of high-quality European butter and a sprinkle of flaky sea salt. It’s incredible.
Common Mistakes That Lead to Pancake Pancakes (Not Souffle Pancakes!)
I’ve made every single one of these errors so you don’t have to.
- Rushing the Meringue: Adding sugar too quickly or not whipping to stiff peaks. Your meringue should be glossy and firm.
- Aggressive Folding: Stirring or beating the batter deflates it. Fold with a light hand and accept a few streaks.
- Heat That’s Too High: This is the #1 reason for deflation. The outside burns before the inside sets. LOW. HEAT. Always.
- Skipping the Steam: The lid and the few teaspoons of water are not a suggestion. They are mandatory for the fluffy, cooked-through interior.
- Pressing Down on Them: Never, ever press down on your Japanese souffle pancakes with the spatula. You’re murdering the air bubbles.
How to Store Any Leftovers (Ha! As If!)
Let’s be honest, leftovers are unlikely. But if you’re a meal prepper, you can do it.
- Let them cool completely on a wire rack. Don’t stack them while they’re warm.
- Store in an airtight container in the refrigerator for up to 2 days.
- Reheating: Do NOT microwave them! It makes them tough and rubbery. Reheat them gently in a toaster oven or a regular oven at 300°F (150°C) for 5-8 minutes until warmed through. They won’t be as airy as day-one, but they’ll still be delicious.
You’re Now a Souffle Pancake Master
See? It’s not magic—it’s just method. With these seven tricks up your sleeve, you’re armed with the knowledge to create the most incredibly fluffy, jiggly, and Instagram-worthy Japanese Souffle Pancakes that will absolutely hold their shape. It’s all about the meringue, the fold, and the patience.
I want to see your creations! Did you nail it on the first try? What’s your favorite topping? Drop a comment below and share your triumph (or your funny failure story—we’ve all been there!). And if you’re looking for more brilliant Breakfast Ideas that will wow a crowd, check out our ultimate guide to French toast next!
Japanese Souffle Pancakes FAQs
Can I make the batter ahead of time?
Honestly, I don’t recommend it. The batter will begin to deflate almost immediately. For the best results, cook it right after mixing.
I don’t have ring molds. Can I still make them?
Absolutely! You can free-form them by piling the batter high into a circle in the pan. Just be extra gentle when flipping. The ring molds just give you that perfect, tall cylinder shape.
Why did my pancakes deflate?
The three most common culprits are: under-whipped meringue, over-mixing the batter, or heat that was too high, causing the outside to set before the inside was cooked, creating a collapse.
Are these pancakes sweet?
They are mildly sweet on their own, relying on toppings like syrup, fruit, or whipped cream to provide most of the sweetness. You can adjust the sugar in the meringue to your taste.
Can I freeze Japanese souffle pancakes?
Yes! Cool them completely, then place them in a single layer on a baking sheet to flash freeze for an hour. Then transfer them to a freezer-safe bag for up to a month. Reheat from frozen in a 350°F (175°C) oven for about 10 minutes.

Leave a Reply
You must be logged in to post a comment.